

If you follow me on Instagram, you may have seen a couple of photos last week of me working on Hazel’s big girl room. I figured having Oliver in Michigan for the week with Ryan’s parents was a perfect opportunity to knock out some big but much-needed projects in the used-to-be nursery. I’ve been the mother of a daughter for over two years now, but this was my first opportunity to truly flex my pink design muscles and I was very much looking forward to it!
For reference: the nursery looked like this two years ago. Oh, it was sweet and perfect and gorgeous. And around that time, we pulled up the carpet in that room (Oliver was having a ton of bloody noses at the time and something had to be done) and laid pine planks, then painted them white and absolutely loved the look.
But back to the project at hand.
I fell in love with some bedding I saw in the Land of Nod catalogue this month. I ordered swatches (they’re free!) to see if the fabric was really as dreamy in person (it was) and was instantly inspired by the pale pink and orangey-red in the swatch pack.

I had a stencil in the closet of my studio that I won in a blog giveaway about a year ago and I’d been saving for a fun project.
Can you see how all of the stars are aligning here?
So. Pretty fabrics. Pretty paint colors. A big, bold, geometric stencil. And a week to make magic happen.

This was the plan:

I knocked out the pale pink (Lauren’s Lullaby A35-2, Olympic) fairly quickly, and the red (Fairmont Suite Clay Red 2009-4, Valspar) took about three coats to make right. But man, it was a really good-looking red!

Still, somehow it just wasn’t coming together as I’d imagined. The red was so intense. Lizzie was here watching Hazel so I could work and she and I both wondered if maybe I’d crossed a color line with this one. That stencil was going to have to bring in some major pale pink to make this feel okay. I knew this was the plan all along – but I had no idea if I’d just signed myself up for something crazy.
Well, there was only one way to find out: Keep going!
Graphic Stencil Wall Tutorial
What You’ll Need:
A great big stencil
Coordinating edge stencil
clip-on level
fresh coat of paint on your walls
1 qt paint for the stencil (that is, if you’re just doing one wall)
small foam roller and tray
2″ paintbrush or stipple brush
ladder
snacks
lots and lots of tape
a great Pandora station
Now, I’ll be perfectly honest – most of this how-to is coming from personal experience as I really only skimmed the included instructions. You know, because I didn’t want to waste time getting started.
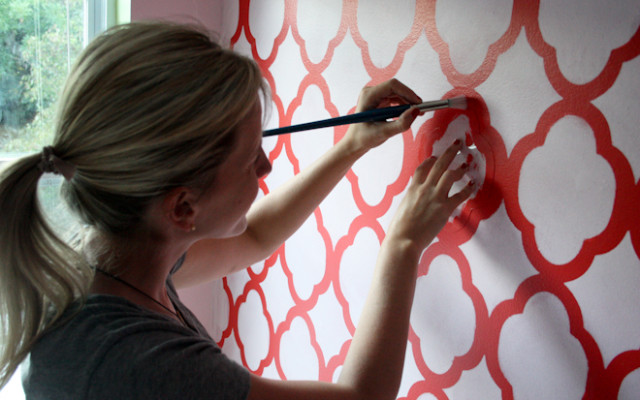
I just began in one corner with the edge stencil as a space guide and worked my way across and down.
{I found that once I completed the top row, painting every-other section made things go more quickly because I could avoid waiting for paint to dry between steps.}

It really is as simple as getting your stencil positioned (I painted my first reference marks in the top left corner of the wall with my edge stencil), taped in place, and rolling the paint on (very light coats). I learned a few tricks as I went – like rolling the foam roller almost dry on the tray before taking it to the wall, and rolling one little opening at a time at an angle to prevent stroke lines – but if you practice on some cardboard or something before you dive into the real project, you can iron all of those techniques out for yourself.
Oh, and do definitely invest in the clip on level. Not sure what would have become of my wall without it!


By the time I got the hang of it I was much happier and far less stressed. Still, this project was very time-consuming and stressful at the onset.
Fortunately, I love projects that are precise and definite (part of why I love sewing), and stenciling can have a lot of exactness to it. It’s the times that things don’t quite line up and you have to fake it that cause me to sweat a bit.
But what’s a project without a little sweat and grey hairs, right?

Once you’ve knocked out all of the big stencil stuff, just go along ceiling and baseboard with your edge stencil to make things look tidy and finished. (And do tape your trim to protect it. It will just make the whole process easier.)

Corners: I think this was the trickiest part. And, I didn’t really figure out the best technique until I was almost finished. The instructions suggested that I just gently curve the stencil into the corner and roll, but that’s malarkey. I was getting paint everywhere it shouldn’t be.
I never creased it, but I got the best results when I actually taped the stencil all the way down on the opposing wall as close to the corner as possible (I already had the corners precisely taped off from when I painted the red wall after the pink walls, this taping was strictly for holding the stencil in place). I was able to roll most of it, and then sort of stippled the tight corners with my 2″ brush to fill in where my roller didn’t reach.

With all of the stenciling finished (main, top, bottom and sides), it was clear that I wasn’t going to be totally at peace with my project as it was. Stencils bleed, paint sneaks out of the lines, accidents happen. I needed to tidy things up.
So, I found some rigid plastic (I used the packaging from our festive Target patio lights) and traced the shape from the inside of the main stencil with a pen. Then I cut it out to create an inverse stencil of each of the two shapes in my design.

Honestly, this was probably the most satisfying part of the whole project. I did it one afternoon and evening and I almost got obsessive about it. It was almost sad when I couldn’t find any more places that needed to be touched up.

Just situate the stencil in place, and brush over any spillovers to create crisp, pretty lines. Mmmm… so, so tidy!

All told, the project took two full days. But, I was alternating dry times with the walls and the floors (the first time we painted the floors we ignorantly applied oil-based polyurethane to protect it instead of water-based. Oil-based turns yellow and after two years, it was yuck! So I laid down Kilz, 2 coats of white and 2 coats of water-based polyurethane during that time as well).
No matter how long it took, though. When Oliver got home from Michigan on Saturday he was delighted to see such a pretty room for his little sister, (Big, fat, happy room reveal yet to come – it’s worth it!) and I really couldn’t be happier with the results. Funny, everyone that has seen texts or Instagr.ams of the progress, and then has seen it in person has said that it’s way cooler than they even expected it to be from the photos. (Does this mean I’m doing a bad job portraying it in photos or is it really just that cool in person? Regardless, glad they weren’t saying it the other way around!)

2 funny things:
1. When I first painted the room with the light pink and red, Hazel woke up from a nap, walked into the room and asked, “Where my room go?!”
2. Hazel would occasionally visit me as I stenciled. At one point (and several times after this) she walked in the room and exclaimed, “It’s Micka Mouse!” I guess I could see that… sorta…
And to close (and in the meantime as we wait for the entire room to be completed for the big, happy reveal), please enjoy a moment of my babies dancing together in the big, empty space (because that’s what you do in a big, empty space when you’re a kid!), and their Mama just feeling lucky enough to capture it with a continuous shot!

Happy Friday, friends! Have a dancey, francy weekend!
Raechel- this is BEAUTIFUL. I am so impressed as big projects like this intimidate me. I’m so glad you shared!!
Seriously, THAT is impressive! And beautiful!!!! And inspiring!!!!
Wow!!!!! I am speechless! This is amazing.
Oh friend, it turned out SO GOOD!! I don’t know if I have the patience to undertake a project like that! I am certainly not a precise person. But my sister is…. Hmmm maybe I can convince her
oh my goodness. I want to come over and dance with those two!! And um … I’m hiring you. PLEASE COME OVER!
Where did you get the stencil from? I want to do that for Harlow’s room, but haven’t found one that I like yet!
Love this! You always amaze me. The kids dancing is so fun. I’ve never used continuous shot on my camera. Once you take the pictures how do you post them like you did so they look like it’s a movie?
you actually create an animated .gif in Photoshop :)
Looks so great!!! I’m a little exhausted looking at (especially after coming down from a paint project of our own), but seriously, so great. Can’t wait! I love the fabric swatch, btw.
BEAUTIFUL!! I can’t wait to see the whole room tour!
It looks amazing, of course, but the GIF at the end took my breath away.
Are you getting the Jenny Lind bed? We got that (in white) for our 2 yr old and to say I love it would be such an understatement. It’s the first LON furniture I’ve bought and it is sturdy and beautiful.
Can’t wait for the reveal!!!
Looks amazing!
I really want to stencil a wall in one of our bedrooms or perhaps the halfbath downstairs but am a bit intimidated by the process. Your tutorial was a great and very helpful!
I have a two year old daughter as well, and can only imagine getting this down with the help of a sitter or grandparents :)
Awesome job, Raechel!! Love it! Love the dancers, too!!
You are so amazing! I can’t wait to see the room reveal.
It looks fantastic! Love the stencil and can’t wait to see the room all together and completed!
Here is another secret for future painting of stencils, squares, stripes, etc….paint the base coat, then tape off design or stencil and paint the base color again over top so that when bleeding occurs you won’t see it since it’s the same color! Also, this creates a barrier between wall and stencil or wall and tape and when you paint the second color it won’t bleed at all. It takes more time as you are adding a step and waiting for paint to dry but trust me, it’s so worth it! Perfectly crisp lines everytime!! I’ve done years of painting and techniques and I know how gratifying it is when those lines are perfect! :) Happy decorating!
Seriously, this is the most gorgeous wall I’ve seen in ages! Please, please come up to IL and do this to my daughter’s room! We’re just 5 short hours from Nashville! ;) You are one talented momma! Can’t wait to see the big reveal!
BTW, we were browsing the Land of Nod cat. the other day in search of red bedding for my daughter’s room and came across that same bedding. Unfortunately, fairies don’t cut it for a 13 year old! And finding red bedding isn’t easy, either!
Gorgeous!! You have some seriously steadfast patience & design dedication!! :)
Amazing!!! You did a great job. You are just exploding with craftiness. I cannot wait to see the full room reveal!
This is so so beautiful!
How many coats of pink did you have to do over the red? Did you coat the entire wall and then go back and do the whole wall again, or did you do multiple coats one section at a time? The first way seems hard because of having to re-align the stencil, but the second seems extremely time consuming! Hopefully this question makes sense…
I happened by your blog from putapuredukes!
Hi Maryann!
I only went over the whole wall once with the stencil – you’re right, realigning would have been tricky and annoying. Every time I got the stencil in place I went over each little opening once very lightly with an almost-dry foam roller. That dried almost instantly, so by the time I was back to the beginning I went over it a second time after refreshing the roller with just a teeny bit of paint (or sometimes not adding paint, just more pressure). Usually 2-3 passes that way gave it the right amount of coverage.
I’d say each section would take 5-8 minutes (?). Then, you either had to wait for that paint to dry a bit before resetting the stencil right next to it (you have to tape it onto the place you just painted), or I’d jump to another spot one row down and alternate. That seemed to go faster and didn’t mess with alignment really at all.
Does this answer your question? Feel free to ask more!
Also, I love Keight! Anyone that’s a friend of hers is a friend of mine! :)
Yup – makes sense! I don’t have any projects like this on the docket, but it’s good to know these things for future reference :)
I can’t wait to see the whole room completed! The stencil turned out great!
I seen the total room on cutting edge stencils blog — LOVE IT! — wondering also where you got the large H at?
Hi Ashley! Thanks – so glad you love it! :)
I made the H myself, and actually wrote and shared a tutorial here in case anyone wanted to know how to make one, too!