

A couple of days ago I received the most exciting package of beautiful fabric in the mail from Sew Fresh Fabrics. And, since I am often wont to mix patterns and colors and designers, I just grabbed the three cuts I loved the most and got to work creating!

Fabric sources: here, here & here
And, since I haven’t done a tutorial for y’all in a while, I figured I’d keep my camera nearby to photograph the project as I went. Perfect timing for a nice and easy handmade Christmas gift tutorial! Let’s make aprons for the little girls in our lives, shall we?
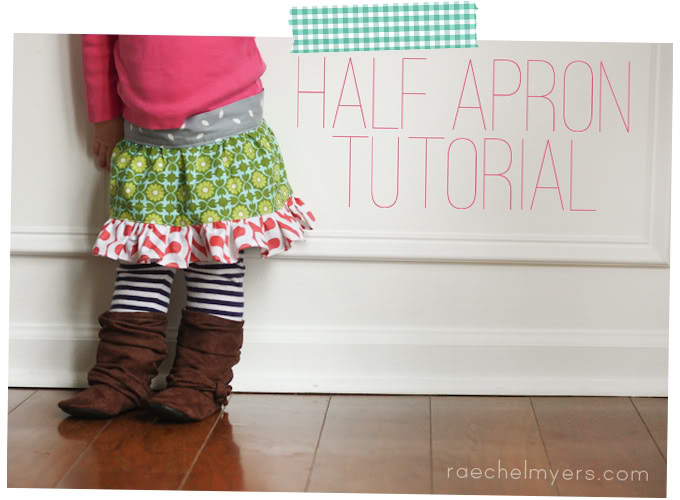
{I know you’re going to ask about the boots. I would, too.
They’re by Gracious May and I found them here. You’re welcome.}
We always start with gathering our materials, but this time it’s pretty simple: you’ll need a sewing machine, fabric you love (I’ll tell you how much in a minute), thread, scissors and a little person.
This pattern is flexible and you can make it work for any size. I’ll give you the measurements for a baby (I still consider Hazel a baby, k?), a kid (ages 4-12) and then just a rough idea for an adult-sized apron. (Really don’t feel like you have to over-think the sizing, aprons sort of custom-fit themselves with the tie at the waist, and the only other difference is length and width preferences.)
Baby:
Fabric 1 (sash) – cut one 4″x15″ and two 4″x19″
Fabric 2 (main body)- cut one 5″x21″
Fabric 3 (ruffle) – cut one 3″x42″
Kid:
Fabric 1 (sash) – cut one 4″x15″ and two 4″x19″
Fabric 2 (main body)- cut one 8″x21″
Fabric 3 (ruffle) – cut one 3″x42″
Adult:
Fabric 1 (sash) – cut one 5″x16″ and two 5″x21″ (or longer if you can spare the fabric)
Fabric 2 (main body)- cut one 13″x24″
Fabric 3 (ruffle) – cut one 4″x42″
I cut my fabrics to the “kid” size. (BUT, important note: I actually went through the entire tutorial making a kid-sized apron, didn’t love its length on Hazel, and then took it apart and created the “baby” size. In the photo, she is wearing the baby-sized apron. Hope that doesn’t throw anyone off!)
We are making the kid sized apron here. See my pretty cut pieces?

Now, stop! Before you go any further, press all of your fabric. If you want your project to be lovely, start with pressed fabric. Amen.

Alright, moving forward: first you need to assemble your sash. We start with three pieces because your fabric isn’t wide enough to cut that length clean, so you’d need to piece it anyway. This way the seams are in appropriate places.
Sew the three pieces into one long piece, with your short piece in the middle and the two longer pieces on the ends.

Now that it’s all one, long piece, fold it lengthwise, right sides together as shown. Take care to line up your joining seams as you pin so everything looks nice and loved.

Okay, now more sewing! We’ll leave the middle part open because that is there the apron will eventually attach. So here’s the plan: using a 1/4″ seam allowance, begin sewing on the inside of one of the joining seams (you’re stitching from the inside, out – beginning on your middle section of fabric both times and stitching toward the ends of your sash). Backstitch well when you begin because you don’t want this seam to slip.

Now stop when you are about 1.5″ from the edge (give or take). With your needle in the down position, lift up your presser foot and rotate your sash 45-degrees so you can make a nice, pointed end.

Finish closing your sash by stitching toward the folded corner. Backstitch.

Finish the other end of the sash the same way (begin in the middle section, backstitch, finish your stitch at an angle, backstitch). Now clip the excess fabric off of the ends. You’re doing great!

Now, invert the sash. (I usually use a small dowel rod or the eraser end of a pencil. You use whatever is handy.) After you’ve righted both ends of the sash, your seams will be a little puffy, but it’s nothing a good bit of ironing (and steam!) can’t fix.

Much better! Sash ends are both finished and pressed and the center section remains open – very excited to be joined with a pretty apron!

One last bit of pressing business before we move on from the sash. (See what I did there?) Fold the raw edges of the center sash section in 1/4″ to conceal them and iron well. Well, done.

And just like that, we’re ready to go on to the ruffle!
Your ruffle is all one piece, so let’s jump right to the hemming. Hem one long edge and both short edges in 1/4″, then another 1/4″ to conceal the raw edges.

Now, stitch that pretty little hem in place.
Begin on the raw end of the fabric and stitch toward the corner. Do this rather close to the edge.

When you get to the corner, drop your needle, lift your presser foot, rotate the ruffle fabric 90-degrees, drop the presser foot, and keep on going. Fancy.

Nice looking hems, y’all!

Okay, last bit of hemming, I promise. And, this will be quick!
On the two short ends of your main body fabric, turn your raw edges in 1/4″ two times (just a typical narrow hem). Stitch them in place and be excited that you’re halfway through for sure!

Now, things get interesting.
This is where we adjust some setting on our machine. Don’t worry if you don’t have a digital machine, you can adjust your dials the same way. We want to ruffle our ruffle fabric, so set your stitch length as long as it goes (5 for me) and increase your tension as well (5.4 for me). (Don’t worry about the 3.5 – that’s just my needle position and it was just a personal preference at that moment.)

Now, run this stitch about 1/4″ from the raw edge of your ruffle fabric. Be sure to leave plenty of thread at the beginning and end for grabbing/gathering.
See the fabric going in straight and coming out ruffled? Pretty fancy, eh?

Now, it’s pretty unlikely that your ruffle came out the exact same length you’ll need to match with your apron body. You’ll have to make some manual adjustments and that’s perfectly normal. Just hold tight on one thread while sliding the ruffle along the line until you’ve got it evenly dispersed and the length (or width or whatever you’d call it) you need. Definitely nothing to get nervy about – ruffles are flexible!

Once your ruffle is the same length as your main body fabric, pin it in place, because it’s time to attach it!

PSA: Don’t forget to switch your machine back to its normal settings. You will be sad if you further ruffle your ruffle with the body fabric. *ahem* not that that’s ever happened to anyone here… *cough*
(I keep my tension at 4 and my stitch length at 2.5 or 3 most of the time and I’m very happy there.)

Now, stitch away! Stitch just on the inside of your gathering stitch so it (the gathering stitch) won’t show when you’re all finished. Keep your pincushion nearby – pins will be flying at this point. (Oh, and take your time on this step. Definitely not a race – be sure and get it right the first time so you don’t have to spend the next 30 minutes muttering unkind words under your breath while wielding the seam ripper of grief and angst.)

Now, this is an extra step, but I’ll include it for those of you that have a serger. This is definitely a serging moment. Tidy up your raw edges and tell this garment who’s boss. (And, if you don’t have a serger, you might like to trim loose threads here and maybe even secure these edges with a zigzag stitch.

Just a few pretty photos of Sergio (my serger) in action. He trims and stitches and smiles as he goes. This bad boy will not fail to simultaneously terrify and thrill you just about every time you turn him on. 
I call the trimmings confetti. It’s always so pretty. Keight calls it cole slaw. Do y’all call it anything?

Okay, sorry. Back on track! Oh, we’re getting close!

Now, press that ruffle down (or really, try to avoid the ruffle with your iron – just try to press the seam allowance up so that you can topstitch it in place. Nice and close to the edge, of course.

Beautiful.

Okay, we’re gathering again. Switch your settings again to a longer stitch length and a higher tension. (Yes, I realize my tension is a little higher here than last time. Pardon my waffling.)

Gather the top raw edge of your main body fabric just like you gathered the top raw edge of your ruffle. Then, adjust it to fit your target length (this time, it’s the inside measurements of your sash opening), just like last time.

As you get things in place for stitching, use lots of pins to keep it in place. Now we really are almost done!

Pinned and ready to stitch!

But first! Get those setting back before you have sad time with seam ripper. You’re welcome.
Begin your stitch this time at that first vertical joining seam you made and run it all the way across to the other joining seam. Backstitch on both ends and try to stay about 1/8″ from the edge. This stitch will show, so take it slow, keep it straight, and use thread that matches your fabric. (I used white the first time, then ripped it all out and used grey when I shortened my apron. Sorry it’s white here. Also, sorry I had to sit down and rip it all out. Sheesh.)

All finished! Congratulations!! (Hazel was napping when I finished my project, so my sewing machine served as my model. Told you that bad boy was versatile!) :)

See how that topstitching makes such a nice difference? And a nice, even hem stitch makes things look so carefully made. It’s nice to have projects that aren’t difficult and don’t take weeks or months to complete, but it’s still worth it to take time to make little details just right!

Variations: embellish your apron! Add pockets, ricrac, appliques, whatever! And definitely don’t feel like these baby & kid aprons are only for baking – it’s one of Hazel’s favorite accessories for going out! Tres chic!

And now comes the part where I ask you to share your pretty projects with me because I love to see them! So many of you are so shy and just email them to me instead of posting them. That’s okay, too. I love seeing! (Btw – check out the cool patchwork oven mitts “imaginegnats” posted in there – so pretty!)
Oh, and definitely feel free to poke around my Tutorials Page for other fun handmade Christmas project ideas!
Have a lovely week, friends! Happy apron making!
Disclosure of Material Connection: I received the Brother NX800 machine mentioned above for free in exchange for a mention of the product in my blog. Regardless, I only recommend products or services I use personally and believe will be good for my readers.
Thanks for sharing this tute! I was just measuring one of my aprons so I could make some for Christmas gifts but it is always easier when someone else has done the guess work for you! HA! Thanks again!
Oh I soo want to make one of these for my niece for Christmas! Thanks! :)
I never would have put those fabrics together on my own….but it totally works and is sooooo cute! I have tons of non-matchy fabric at home and now you’ve encouraged me to pick my three favorites and make this apron. If I do I’ll blog about it and share it with you. Thanks for the tutorial – as always, it’s a great one.
adorable apron! i have two girlies that def need those :) and thanks for the kudos on my oven mitts.. it was a great tutorial (hint hint: everyone should try it!)
it’s SO coleslaw, and i am making it like crazy these days with all the scarves. i just discovered that throwing knit coleslaw creates a fabric firework. it was amazing. so glad to see old sergio back in action and those pretty vika being stitched upon. top shelf tutorial, as usual.
Okay, how did you get that pretty paper in where all the buttons and the panel that tells the stitch length is? Did that come with the sewing machine or did you put that there? It is SO pretty!
Alicia – I had to read and re-read your question then look at all the photos in my post to figure out what you were talking about. It just occurred to me – the pink flowers!! Haha – sorry about that. It actually is a part of the machine design – isn’t it lovely?
I loved how easy this was – I made two!
Thanks for the great tutorial!
http://addicted2tutes.blogspot.com/2011/11/cookie-making-aprons.html
~Andrea
Raechel – thanks for the awesome tutorial. I made one today for my niece and will make a few more for gifts. Here is the link to my post about it if you wanted to see what you taught me!
http://bethanyandbrad.blogspot.com/2011/11/diy-half-apron.html
here’s my first attempt!! crazy crooked hems but we will work on that!! http://www.facebook.com/photo.php?fbid=10150795035507941&set=a.10150687626337941.419963.628737940&type=1&theater
aw, bummer! I can’t see it!
Thanks for this. Am really happy with my first attempt!
Thanks, I just finished my daughters apron! It is adorable..thank you for the instructions. I do hav ea ?: do you put the gathered fabric inside the middle opening of the sash or just leave the sash on top?Thanks again!